SMR Blog Posts

Cat Claw

Cc 1a IMG 0272a

1) Cat Clawclick here

This is essentially a particular modification of Child’s Pose from Yoga. The specific difference between Cat Claw and Child’s Pose is that with Cat Claw you reach across with both hands toward one side and drop your head underneath your armpit to allow a deeper stretch of the musculature attached to your shoulder. As you move your hands from one side to the other you should “walk” your fingers across, much like a cat’s paws clawing at the carpet. By walking your hands across instead of lifting and placing your arms on the other side you are less likely to stimulate the muscles attached to your shoulders which should allow a deeper stretch across the joint.

Video coming soon.

Which SMR Techniques Should I Do?

Click the techniques below to learn how to help your issue.

The 23 Fundamental SMR techniques are to be practiced at least once every two weeks for each technique, but more often will be necessary for some areas. The Fundamentals include the 3 Primaries and the 20 Secondaries.

The 3 Primary SMR Techniques are to be practiced at least once a week. More often is likely to benefit you more.

The 20 Secondary SMR Techniques are to be practiced at least once for each technique every two weeks as an assessment. More often is likely to benefit you for some techniques, but you should never ignore an area for more than a couple weeks before inspecting it again to ensure you aren't skipping a problem when it is small and relatively easy to fix.
The 47 Extended SMR techniques are to be practiced as needed when dealing with a issue in that area of your body (normally two or three techniques per day). These techniques are meant to be done almost daily when you have an issue in that region (and ONLY when you have an issue in that region).
Take 2-5 minutes for each SMR exercise per side of your body. This will provide enough time under tension to stimulate the GTO and your muscles will likely relax more, allowing you to make quicker progress toward full range pain-free movement. Quicker movements tend to stimulate the muscles, whereas slower movements tend to relax them.

You may need significant SMR work in a particular area. Work through all 70 of the SMR techniques as needed, plus the nearly 90 stretches to address every skeletal muscle in your body. Over time you should need these techniques less often and it should take less time with each technique to get the release you are seeking.
**All information is provided for educational purposes only. You should consult your doctor before attempting any exercises you read on this page or any page on this website.**

Pecs Roll

pecs-roll-1c--gallery
10th Secondary -- Pecs Roll
Use this SMR exercise to address the muscles in the front of your chest (primarily the pectoralis minor).

It is best if you practice the Lats Roll in conjunction with the Pecs Roll. Addressing both the lats and pecs in the same session maximizes the release possible in the largest muscles that limit your ability to raise your arm.

If you have trouble with rotator cuff issues, shoulder impingement, frozen shoulder, or just about any other discomfort in your shoulders or neck, then this exercise is for you!

The pectoralis minor muscle is involved in everything you do that involves the shoulder blade. When it locks up, all shoulder movements (and even some neck movements) are compromised.

You should do this movement at least once every 2 weeks. (more often is better) The Pecs Presses in the extended regions may also be necessary to get the best release. Practice all the pecs techniques in rotation over 10-14 days along with all of the shoulder techniques (Primary, Secondary, and Extended) when you are attempting to clear a shoulder issue that needs more attention.
For written instructions, click here to download a printable PDF of the Pecs Roll
Be sure to post your questions and comments below. We want to provide the best instruction to help you recover from your workouts.

Click here to return to all of the Fundamental SMR Techniques

**All information is provided for educational purposes only. You should consult your doctor before attempting any exercises you read on this page or any page on this website.** 

When Do I Practice SMR?

clock
Many of us "out there" do not know when we need to practice a little SMR, or instead a little stretching, or when we should go harder with our workouts, or when we should take a recovery day, etc.

We will not answer all of your training related questions in this post, but we will begin the decision-making process for when to stretch or practice SMR prior to your workout by providing a nifty little flowchart you can refer to when you are beginning your warm up.

Workout-Self-Care-FlowchartIf you can stretch properly and lengthen all of your muscles without any massage work, then your body is working as it should. Simply continue doing whatever it is you are already doing! It's like the saying, "If it isn't broken, don't fix it!" You should stretch and exercise regularly. If you are fully capable with only these two elements in your schedule then you do not need to seek additional methods and assistance.

583_cropped_730x4122-625x360We must stress the need to conduct an assessment of whether or not you truly have the Range Of Motion (ROM) to do all the things you wish to do in your life. To do this assessment you will not need any special knowledge, equipment, or training (no, you do not need a wired hat like in the picture above).

Try to lift or move the normal things in your home or work life. Are these movements easy? Now try to move just a little farther than the ROM you need for those activities. You should be able to move much farther without a load than you can with the load, and well beyond the range you require for any movement (such as touching your toes or reaching straight overhead).

QuitterInstead of challenging themselves to maintain or increase their ROM, many people simply make excuses to no longer do certain activities because they hurt or they have a mistaken belief that the movement in-and-of-itself is dangerous (like squatting below parallel or running is bad for you).

We believe quitting is bad! We want to help you find ways to learn or revisit activities without injuring yourself. Scaling the ROM, loads, and repetitions in any program is almost always a must at times, especially in the beginning, but quitting should never be your answer. If you do not know how to modify your movements to make them safe, hire a personal trainer to guide you.

Workout-Self-Care-FlowchartSo how do you know when to stretch, exercise, practice SMR, or seek the help of a qualified professional? The flowchart above makes it simple. The text below walks you through it...

  1. Start moving.
  2. Feel stiff and restricted?
  3. Stretch and do some light exercises.
  4. Still feel stiff and restricted?
  5. Practice some SMR and more stretching/light exercise for the tight areas.
  6. Still feel stiff and restricted?
  7. Are you hydrated? (especially hydrated with balanced electrolytes)
  8. If you are capable of safely performing the movements in the workout, proceed. If not, contact your local hands-on therapist to get the help you need. Here is a link to help you find some local therapists.

Does this list cover everything you need to know about self care? No. Does every problem have a complicated answer. No. Some of the simple things that will solve your problem you are not in the habit of doing. The most common cause to movement limitations in the gym that we've found in over twenty years of instruction is the lack of effort a person makes into changing the bad habits they have. Start with hydration. Add some stretching. Move in ways you might not be doing while you are at work. Limber up those joints and extend your reach just a bit outside your comfort zone. When stretching is not improving your ROM, add in massage work (both on your own and with a professional). If that isn't solving your movement limitations, then take it a step farther but with professional guidance. Take a concerted interest in your own health and well-being. It is not the physician's job to be your nanny and clean up after all of your mistakes. You need to clean up some of them yourself.

You just might be surprised by how much you can improve your quality of life by diligently practicing your SMR homework, some complimentary stretches, and keeping yourself hydrated. Take it one day at a time. Now go take care of yourself!

Toe Alignment in Footwear for Foot Health

Toe-Smiley-Faces

If you are anything like me, you have struggled with toe, foot, and calf issues for years. It came to my attention at 19 years of age that my shoes were NOT the right size for my feet. usmc-boot I joined the United States Marine Corps,and amongst the moments of shear terror, aggression, and exhaustion I learned a few things that weren't specifically about killing my enemy. One very important lesson I learned on day one: my footwear had been too small for my feet for most of my life.

I was wearing a size 9 shoe when I entered MCRD San Diego to begin my Marine Corps training. They collect all your personal clothing, wallet, jewelry, etc. when you enter and issue you all the clothing, toiletries, and other personal effects you will use while on your 13-week journey to becoming a killing machine. When they issued me size 10.5 boots I responded "I wear size 9," to which they responded "WHO THE F*&% HAS BEEN PUTTING YOU IN SHOES TOO SMALL FOR YOUR FEET?!?!?!"boots0410

That was 25 year ago, and it has taken me the majority of that time to undo the severe restriction of ROM and function in my feet and toes that was a product of "binding" my feet in footwear a size-and-a-half too small for the majority of my formative years. Amazing how hard it can be to overcome a few years of poor choices...

About ten years ago I began wearing Nike Free shoes.
eric_avar_nike_free_original Not only were they SUPER comfortable (like wearing a sock and walking on marshmallows), they could roll up into a ball or move in all the amazing ways a foot is supposed to be able to!nike-free_final_std.original

That lead to "zero-drop" shoes like my Merrell Trail Gloves. I still own 5 pairs of these and LOVE them!
merrell-trail-glove

Which then lead me to Vibram Five Fingers. Pictured here are the Treksport Sandals, my FAVORITE of the Five Finger lineup!Treksport_Sandal-M4301-hero

And I've experimented along the way with numerous massage tools, compression garments and tools, toe spreaders, toe exercise devices, etc. While still continuing to work on my toe and foot function, the work has paid off. I no longer experience severe calf and foot cramps. I have MUCH better hopping endurance than I ever had in my youth. I can walk barefoot on stone pebbles now (which I could not do when I was ten years old). I was also able to resolve significant nerve pain in my toes without surgery or drugs. Below is a short video from one of the influences along my journey to happier feet. Please take a moment to watch and learn what you can do in your free time to help yourself have set of "happy feet."

Just what is "Flossing?"

CP-Thigh1Unfortunately because of the popularity of some web videos, many people think applying elastic straps to the limbs or joints is called "flossing." The straps actually have little or nothing to do with the flossing process. Here is a good audio explanation of what "flossing" actually is.

It is actually a series of movements with specific joints and limbs to lengthen the nerve branches and "pull" them through the channels they are supposed to pass through easily. You should see a licensed therapist for instruction of which movements are safe and necessary for you and your specific needs. As mentioned in the audio clip you really should not explore flossing on your own with simply some web videos and your perception of pain as your guide. Flossing is AMAZING when needed and done properly! If practiced incorrectly it can irritate an already compromised nerve issue, if not lead to permanent nerve damage (which is what we would call a "bad" result).

All4The compression straps we use are safe and effective tools one uses to improve circulation locally with specific muscles in the arms or legs (click here for some instructional videos). Not only will the improved circulation help with function and recovery for almost every method of exercise, the immediate flush of circulation reduces spot sensitivity for the local muscles so that massage techniques are dramatically more comfortable.

Can you say "not-so-painful Quads Roll?"
This means a deeper, more effective self-massage with less pain and longer lasting results.

The more you know, the better your self-care results will be. Contact us to reach a Certified Alexander Method of SMR trainer to learn more!

Core Concepts

We utilized the following concepts to build the Alexander Method of SMR.

These physiologic processes, laws, and principles provide the foundational concepts to fully understand how to approach self-care in the safest, most effective manner possible.

We provide definitions and descriptions of the concepts below, as well as link to external sites when possible to offer more resources.

If we can help you understand the relationship of these concepts to each other and how to use them in managing your muscle issues, do not hesitate to call on us. You can sign up for one of our upcoming certifications at SMRCerts or email us at info@smrtips.com.

We are here to help you get more out of your self-care efforts!

Davis's Law

soft tissue models along...

Read more

Autogenic Inhibition

is a process whereby a sensor in the tendon (golgi tendon organ or GTO) sends a signal to...

Read more

Stretch Reflex

the knee-jerk response your thigh does when...

Read more

Relative Flexibility

using a combination of joints to accomplish...

Read more

Reciprocal Inhibition

the process of one muscle activating (agonist) and causing...

Read more

Arndt-Shultz Rule

(formerly Arndt-Shultz Law), relax and take...

Read more

Law of Facilitation

the path of...

Read more

Serratus Posterior Inferior

spi -- 2016
Serratus Posterior Inferior

Pictured above is the serratus posterior inferior (SPI). It is an important muscle to address because it tends to be tight and limit your ability to draw in a deep breath.

It is commonly overstretched and lacking proper mobility in persons with poor posture due to excessive rounding of the middle and lower back. 80% of all adults over 18 years of age have some form of back pain. If you aren't checking the SPI for excessive stiffness you are missing one of the most significant links to proper back function.

The muscles on the left are layered, showing how some of the muscles are covered by the others. All of the muscles are see-through so that you can appreciate the location and size of each muscle relative to the others.

Click here for a list of all the muscles.

Individual hip, lower back & thigh muscles you might be interested in: (any inactive links will be live soon)

The following muscle attaches across the middle & lower back to the bottom four ribs and the last two thoracic vertebrae and the top two lumbar vertebrae:

  1. Serratus Posterior Inferior

The following muscles attach across the hip & lower back, or to the hip from above (the spine and/or ribs) or below (the thigh).
Click the appropriate link for your interest.

Click here to see the hip flexors as a muscle group.

Click here to see the adductors as a group.

Muscle that crosses the hip/lower back joint and crosses the hip/thigh joint. (attaches to the spine and the femur)

  1. Psoas


Muscles that attach to the hip and the spine and/or ribs

  1. Rectus Abdominus
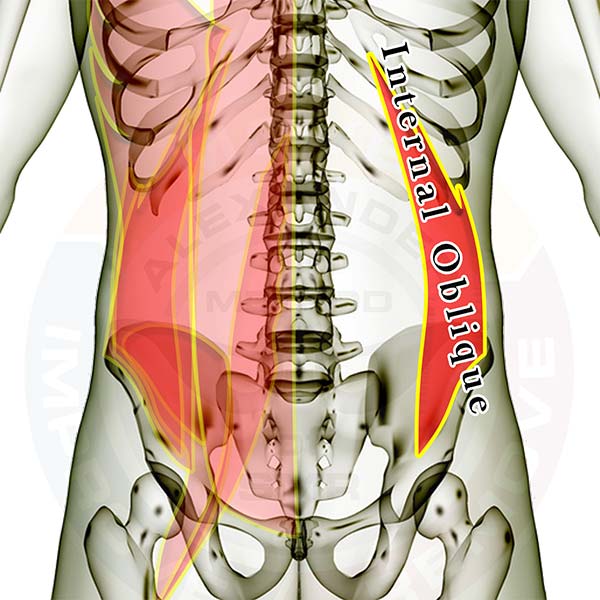
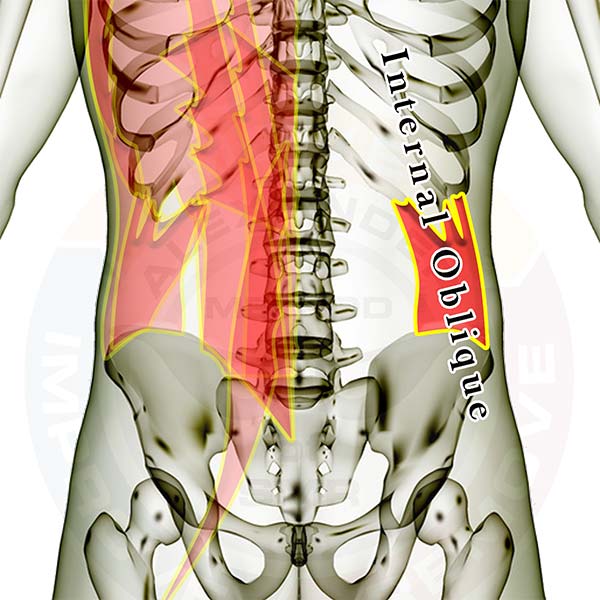
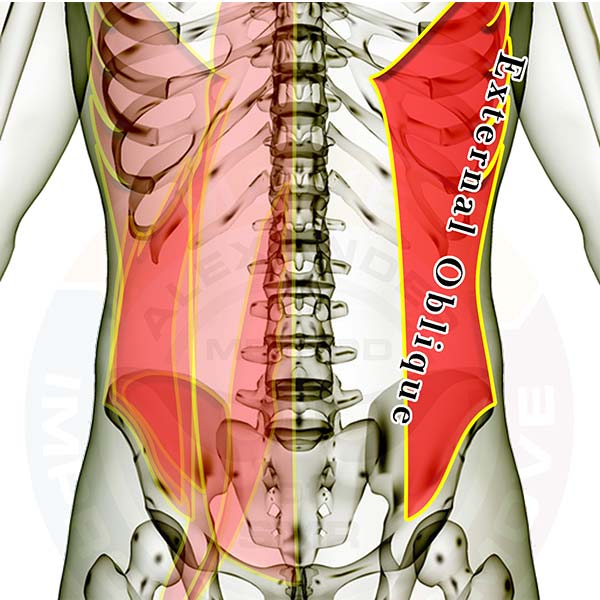
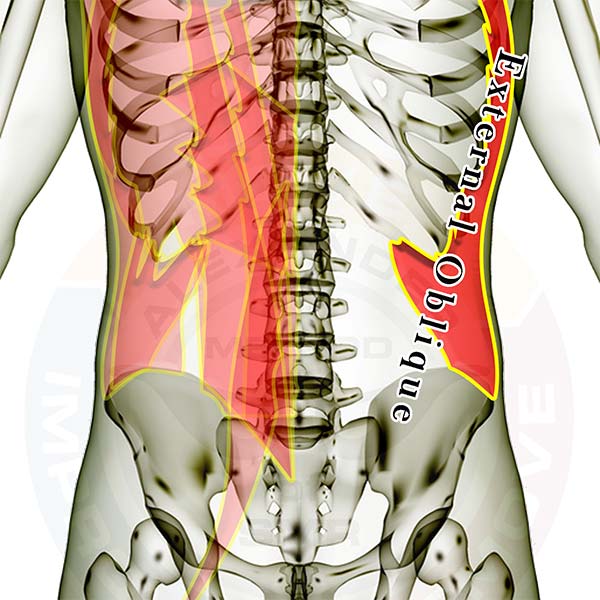
  2. External Abdominal Oblique
  3. Internal Abdominal Oblique
  4. Transverse Abdominus
  5. Latissimus Dorsi
  6. Iliocostalis Lumborum
  7. Longissimus Thoracis
  8. Quadratus Lumborum
  9. Multifidi


Muscles that attach to the hip and the thigh bone (femur)

  1. Iliacus
  2. Adductor Magnus
  3. Adductor Longus
  4. Adductor Brevis
  5. Pectineus
  6. Gluteus Maximus
  7. Gluteus Medius
  8. Gluteus Minimus
  9. Piriformis
  10. Superior Gemellus
  11. Obturator Internus
  12. Inferior Gemellus
  13. Obturator Externus
  14. Quadratus Femoris

Good luck working out those tight knots.

If you have any questions, please post a comment. We try to respond within 24 hours.

We're here to help you get more out of your training!

Delts Press Wall & Floor

delts-press-1a--gallery
44th & 45th Extended -- Delts Press -- Wall/Floor
Use this SMR exercise AFTER you do the Lats Roll and the Pecs Roll (or one of it's alternatives). 

This SMR exercise addresses the three heads of the deltoid muscles.

If you have trouble lifting your arms overhead then this exercise is for you!

Keep in mind that the lats and pectoralis minor muscles are involved in everything you do with the shoulder blade.

You will likely benefit from loosening knots in the delts, but be sure you stretch out the lats and the pec minor or your issue is likely to come right back.
For written instructions, click here.

(Video coming soon!)

Click here to see the rest of the SMR Techniques.
Be sure to post your questions and comments below. We want to provide the best instruction to help you recover from your workouts.

**All information is provided for educational purposes only. You should consult your doctor before attempting any exercises you read on this page or any page on this website.**